
The following post is a little departure from the typical agile-centric posts that normally appear on this site. This article details the process of creating a workable pipeline through Visual Studio Team Server (VSTS). Why is this important? If you are on an agile team, you need to broaden your skill set so that you can help the team meet all the demands needed to produce an workable product increment. Learning how to do an automated deployment will be beneficial as you are able to free up valuable technical team members to work on other things while you can handle the task of creating the pipeline. If you aren’t a developer (like me) this is another step in the process of being a “T-shaped” person on the agile team. You can find out more about the importance of team skills here.
A Pipeline Explained
In VSTS, you can create a pipeline that will deploy your solution to the identified server using specified task and business rules. Rather than manually moving the files on your development computer to the targeted server, VSTS can do it all for you. Your Pipeline can be super complex with various rules and tasks integrated into it, or it can be super simple. The complexity of your pipeline is going to depend on your environment and business rules you have to follow for a deployment.
Benefits
One of the key benefits of an automated pipeline is that it removes the risk of error in the deployment process. When you have your source code integrated into VSTS, you don’t have to worry about having the right versions, or the right files to deploy. Additionally, having an automated pipeline gives your non-technical team members the ability to push a build to an environment when needed rather than waiting on a technical person to complete the deployment. You are giving your team the ability to push a deployment to where they need it at any time. An automated deployment will set your team up for more agility and self-empowerment.
The Things You Need
- Source Code in VSTS
- Build Agent
- Deployment/Target Server (I’ll be using an IIS web server from my VM that I have setup in Azure)
- Windows Remote Management (WinRM) configured with a hostname, and certification thumbprint
- Firewall rules to allow HTTPS connections on a specified port (We’ll use 5869 for this example)
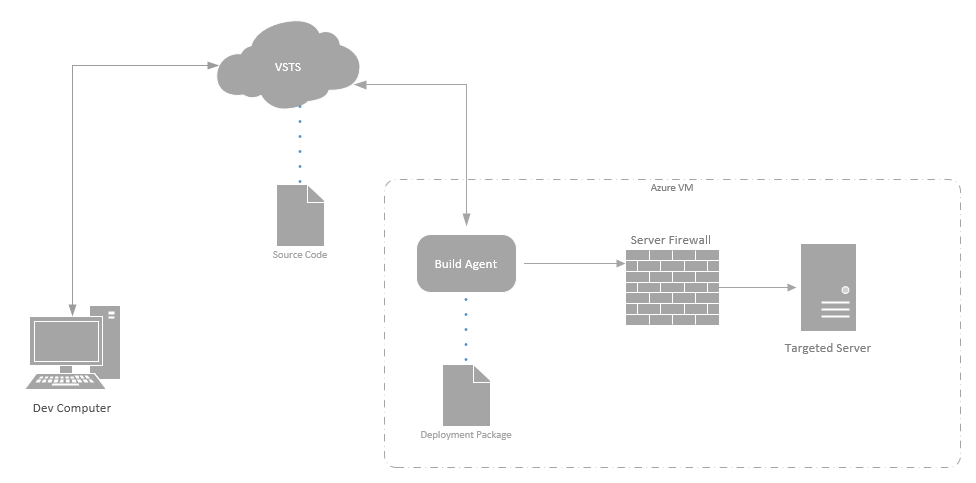
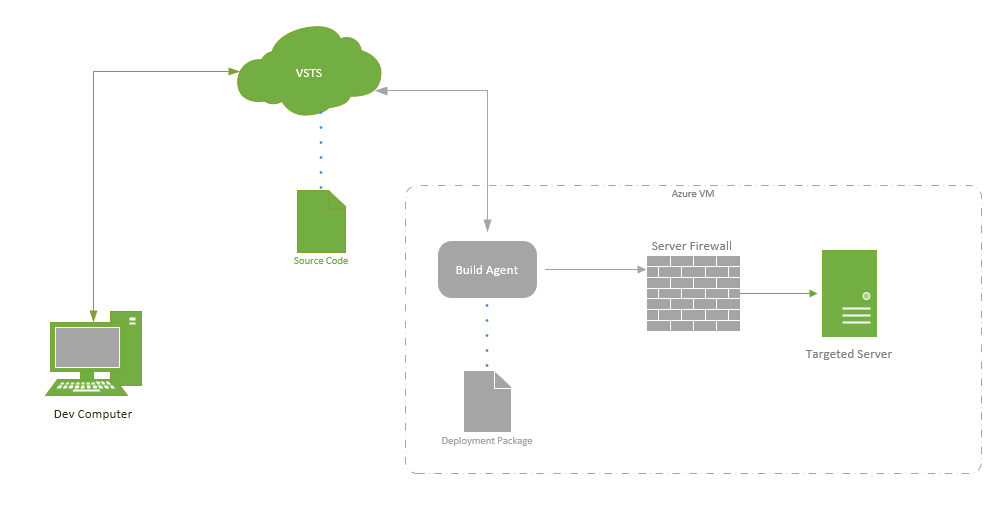
The image below shows how my pipeline was configured. As you go through this walk-through, I’ll explain some of the variations that are out there (as not all pipelines will look like this).But, basically, The build agent takes the source code, creates a build resulting in a deployment package. The build agent then communicates with the targeted server (assuming the firewall allows the connection) and deploys the package to the server.
 Server and Configuration
The first thing I had to do was provision a server. I have an account with Microsoft Azure, so I decided to create a VM there. There are a number of different options to chose from. Since I was doing this as a demonstration and a learning activity, I kept things simple. I created a Windows Server VM by selecting the Windows 2016 data center option. Once you create the VM, you’ll have access to it’s different configuration options in Azure. A key thing to enable/remember is to configure the inbound port rules. I needed to create a new inbound port rule
A view of the network rule I created on my VM
Another key thing is to remember the DNS name specified for the VM you created. You can find this by going to the over view of the VM Machine (see below).
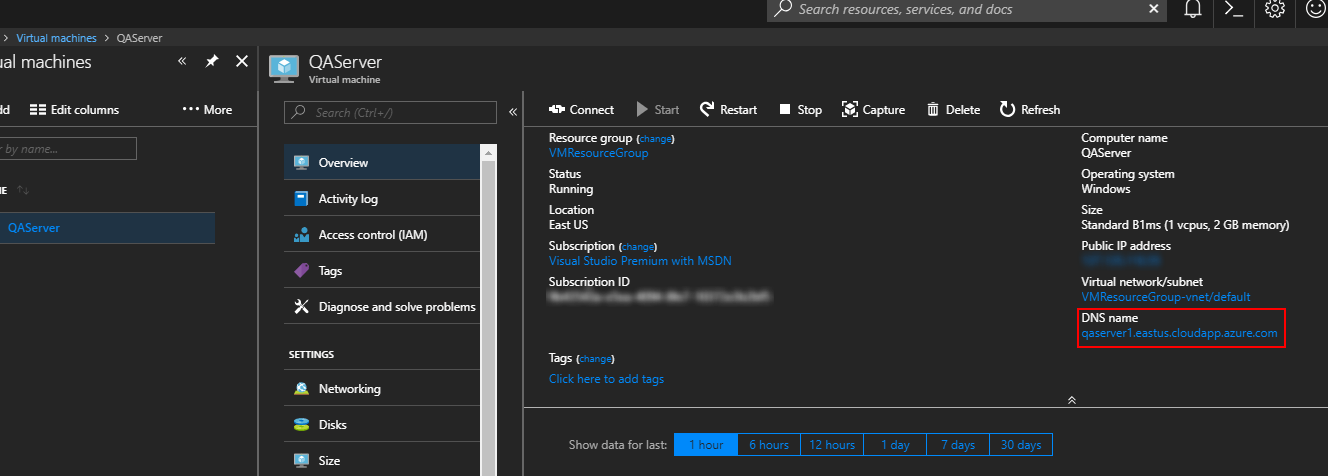
You can find the DNS Name on the right side of the UI.
So now that you have created your server, configured it to the correct connection settings, you will want to connect remotely to the server. I connected via RDP by hitting the Connect button on the menu, downloaded the RDP file and put in my credentials that I used when creating the VM. Once connected you will want to setup a folder where the build agent will be deploying the deployment package. Since I was just doing this for my own personal learning, I created a folder right on the C drive (C:\MyDestinationFolder).
Setting up your Source Code for the Build
In order for the build to be done correctly, there are a few things you need to do. This portion of the article is based on the walk through you can read here on Colin’s ALM Corner. Basically, what you are doing is creating two necessary files: a “Release.pubxml” file and a “parameters.xml” file. These files do two things:
- Prepares the package by creating tokens for the connection strings that will be needed for deployment by the build agent
- Creates tokens for the settings in your web.config file that you need to change based on the deployment environment
Lets look at how to setup these two files in detail.
Setting up the Release.pubxml file
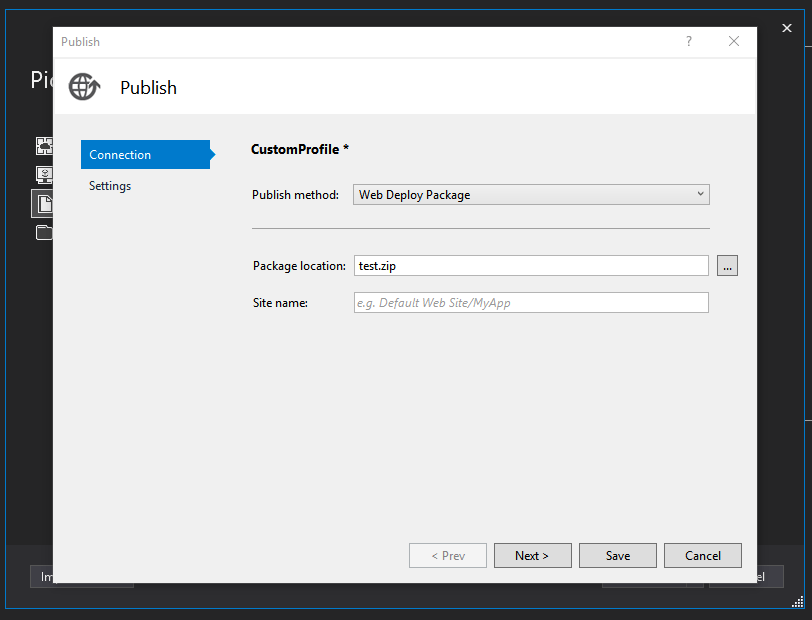
This is pretty straight forward. When you first go to publish your solution, you will get an option to pick a publish target. To get to the Create Profile wizard, you will need to right click on the root file and click “Publish. . . “.
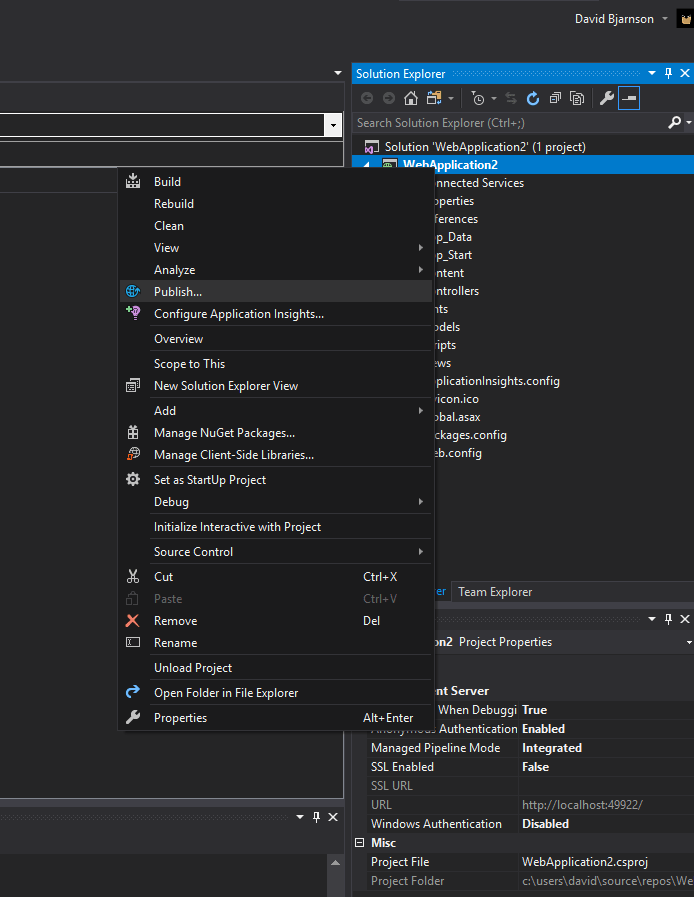
Right click on the root file and select the publish option.
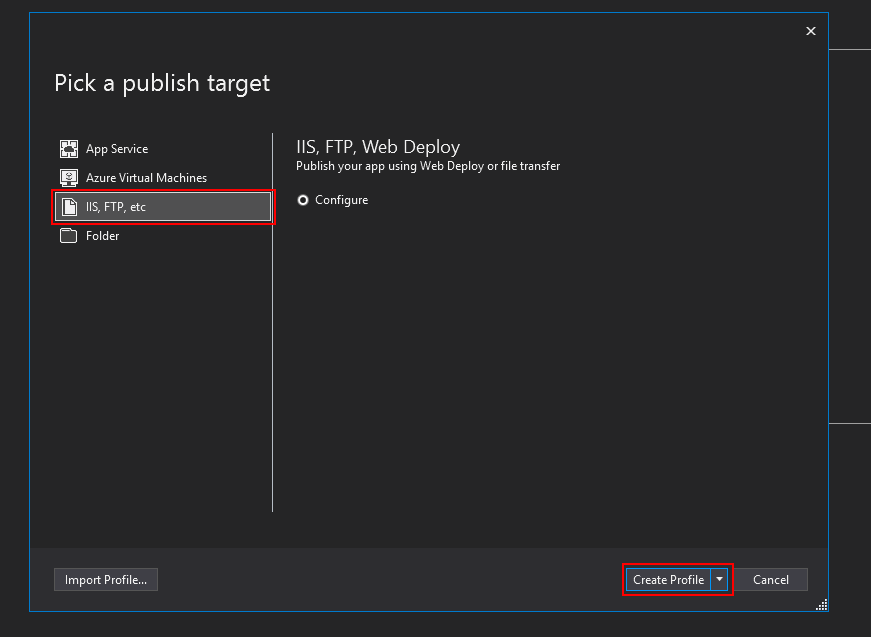
Select IIS, FTP and create profile to get to the publish profile wizard.
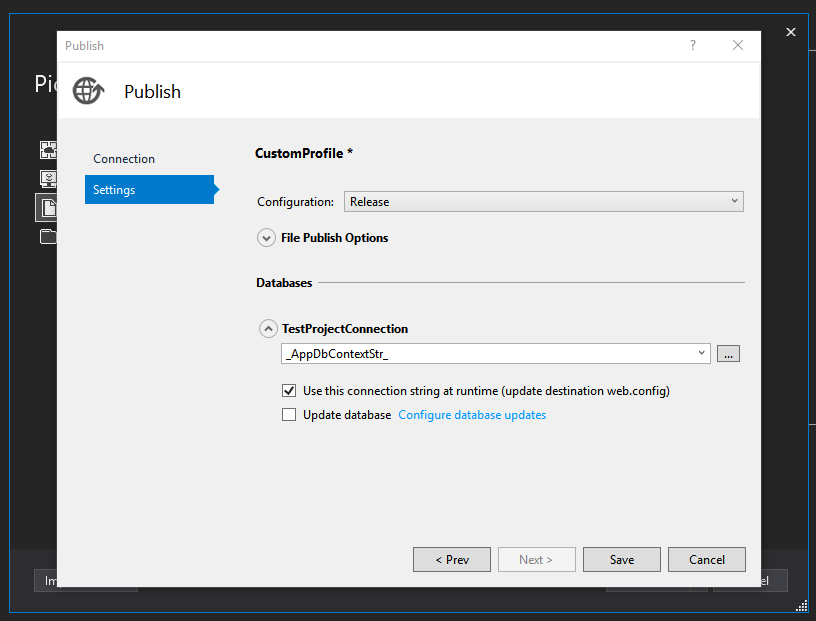
When you click on “Create Profile” you will have the publish window show up on your screen. It has two components: Connection and Settings. On the Connection component, select “Web Deploy Package” and enter the location of the package with the .zip extension. I just named mine “test.zip” and moved on to the settings component. On this portion, I left the configuration option as “Release” and put in the token string for the connection(s) listed on the databases section of the pop up window. I used “_AppDbContextStr_”.
Once you have all the options setup, click on save and you will see the Release.pubxml file within your solution explorer. It’s now time to create your parameters.xml file.
Creating the “Parameters.xml” file
In your solution, create a new xml file in the root of your application project. Within this parameters file, you can specify anything you want to expose from the web.config file to inject tokens to rather than manually changing the web.config. Here is a look at what my parameters.xml file looks like where I’m taking my environment setting from the web.config.
<?xml version="1.0" encoding="utf-8" ?>
<parameters>
   <parameter name="Environment" description="doesn't matter" defaultvalue="__Environment__" tags="">
      <parameterentry kind="XmlFile" scope="\\web.config$" match="/configuration/appSettings/add[@key='Environment']/@value">
      </parameterentry>
   </parameter>
</parameters>
Now that you have these two files created, you are ready to move onto the next step.
Getting your Source Code in VSTS
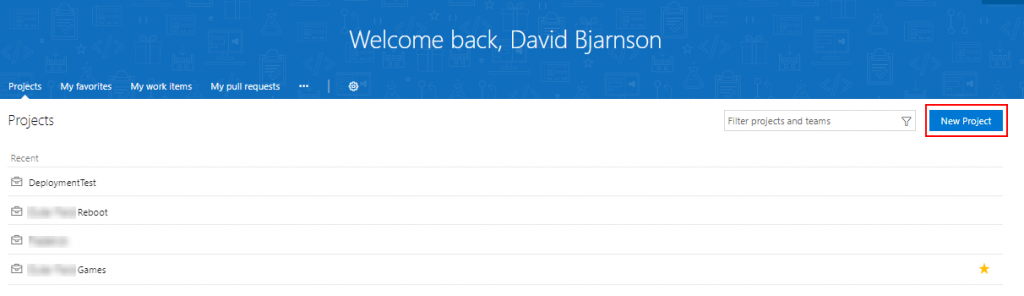
If you haven’t already put your source code in VSTS, you will need to do that. The following walk through will show you how to easily do that. If you already have your source code connected to your VSTS project, then skip this section.
I logged into VSTS and created a new project on the welcome screen. When you create your project, specify Team Foundation Version Control as your Version Control option.
Create a project in VSTS
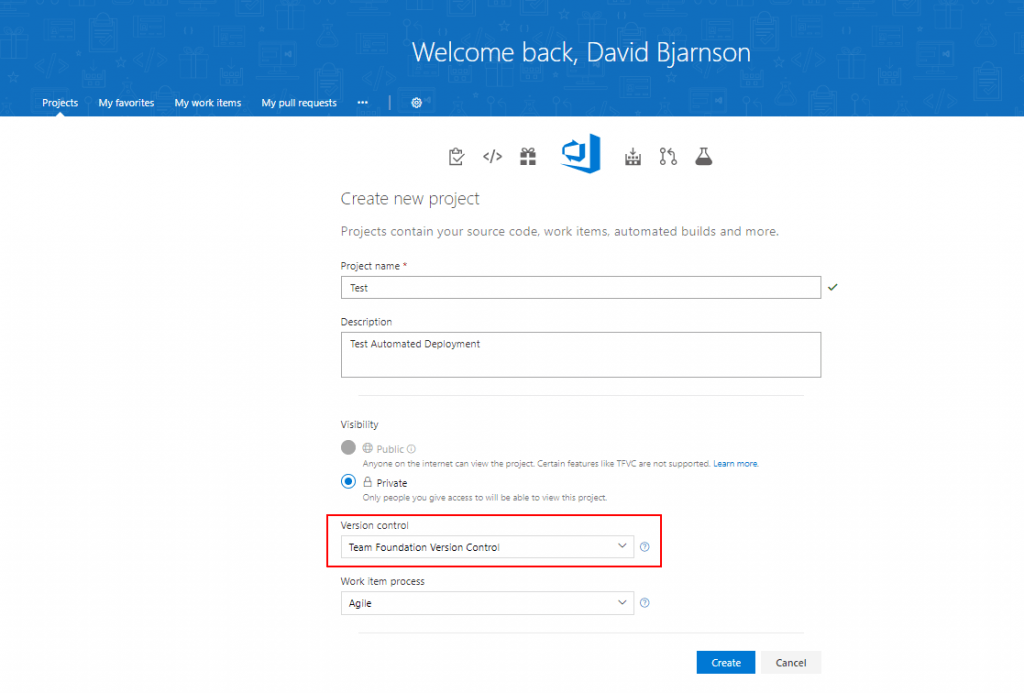
Selecting the correct version control option for the automated deployment to work.
Once you have the project setup, you need to connect it to your local machine. Open up Visual Studio and on the Team Explorer Tab on the right of the screen click on the Connect icon. The tab will then show available connections that you already have setup. Click on the Manage Connections link and select connect to a project. A popup window will show up where you select the appropriate project that you setup in VSTS. You now have the link established between your VSTS project and source code.
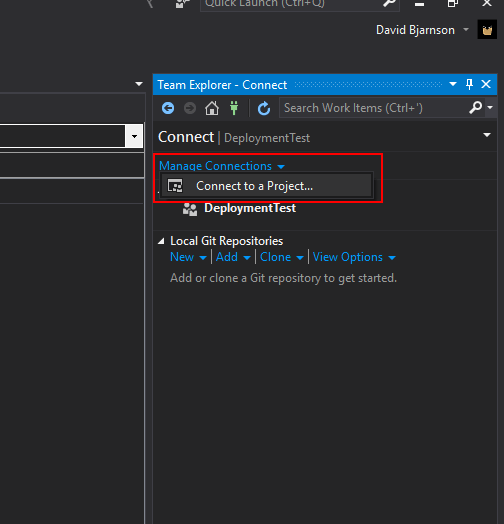
Use the Manage Connection link to setup your connection with VSTS from the Team Explorer tab.
The final step is getting your files up to VSTS off of your computer. To do this, simply click on the Solution Explorer Tab, then right click on the project and select the “Source Control” option. A pop up will show with your project from VSTS listed. Select the project, click OK, and Visual Studio will then make the connection between your solution on your computer and your project in VSTS.
 With the connection established, you can now check in your files to push them up to your project in VSTS. Do this by right clicking your root folder and selecting the “Source Control” option. As you hover over that option, you will have a secondary menu that gives you the option to check in your files. Select that option. Make sure you are checking in your Solution Root Folder. Your files will need to contain the .sln file for the build to work.
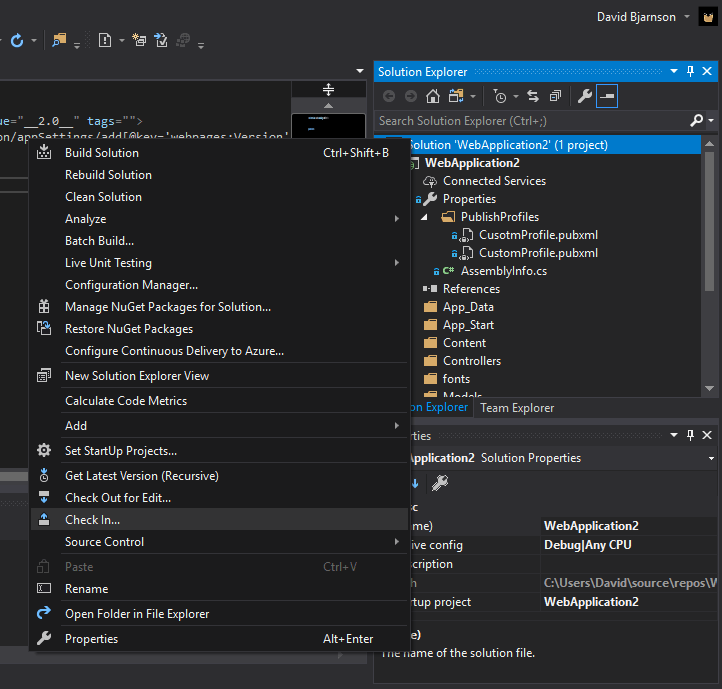
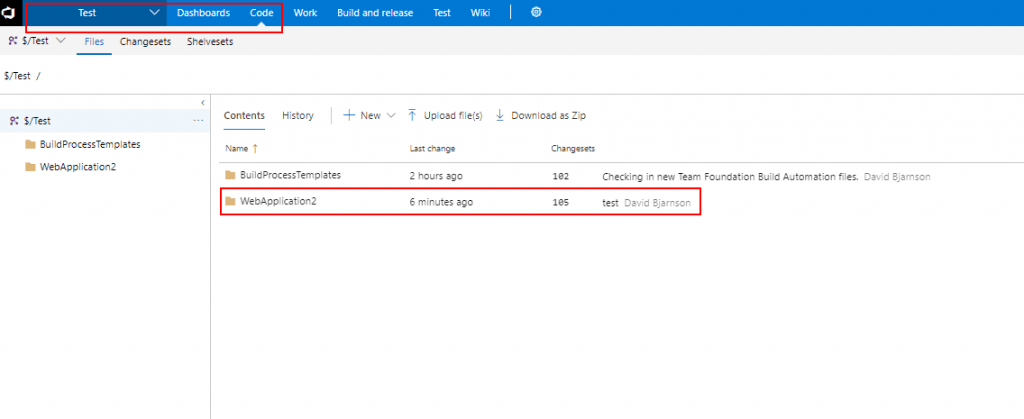
You will be taking to the pending changes section within the Team Explorer tab on the right side of the UI within Visual Studio. Put in your check in comments and select “Check in”. 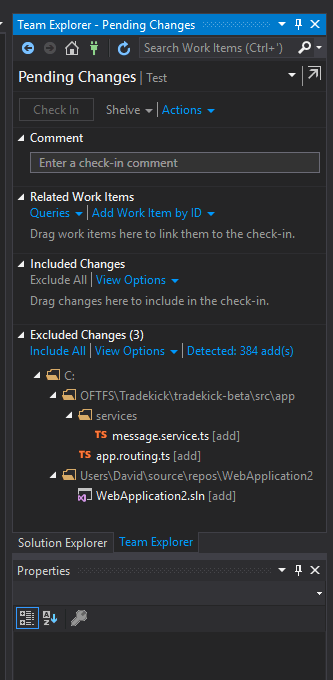 Visual Studio will then push all the files to your VSTS project. You can validate that your files got pushed to VSTS by looking at your code section within the project.
Now that you have your source code successfully in VSTS, with all the correct files needed for a build, you are now ready to create a build.
Before we get into the build portion of this walk through, let’s take a review of the process and where we are at. In the first part of this tutorial, we provisioned a server and defined the port that we want to connect to when we authenticate past the firewall. We connected our solution on our computer with our project in VSTS. Then, successfully checked in our code to VSTS where it now resides. You can see our progress below with the done portions of the chart in green.
 The Build Pipeline
When you first click on build, you will get an option to create a build pipeline. Click on the “Set up a pipeline” option and you will see the following screen:
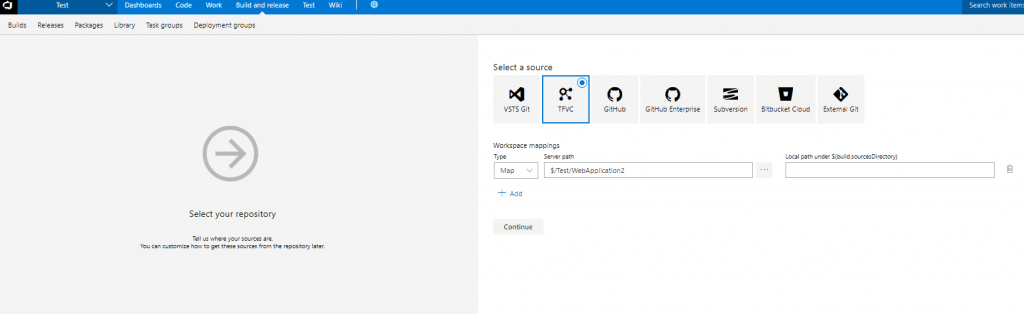
Click on the TFVC option and browse to your source files in VSTS by using the ellipses to the right of the Server Path Field. When you have those options filled out, click on the continue button. Microsoft adds a lot of different templates to pre-fill a build pipeline. Your tasks might be a little different than mine. But, I started out with the ASP.NET template. When you select that template, the following pipeline is pre-built for you:
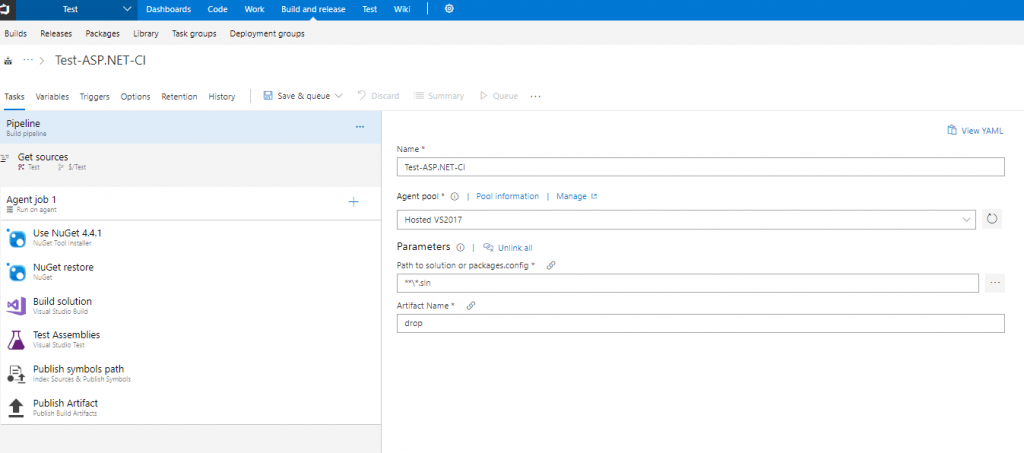
Build Template Configuration
Since we are only doing this as a test pipeline, I’m going to keep things simple. So, I’ll remove the Test Assemblies task as I don’t have any automated testing setup. The rest of the settings for each task can be left as is (it’s that simple). You may want to add additional tasks to make your process a bit more robust, but for now, we are just interested in pushing something to a different environment via VSTS.
Testing the Build
Now, if you want to test your build, you can select the build agent on the task list to see the details. You can choose to do a couple of different things with the build agent. If you want to simply create a build with little effort, verify that your build agent is a hosted build agent. This is a build agent that lives within the VSTS infrastructure and will take your source code to build a deployment package. For my pipeline that I just set up, I used the option as seen below and was able to create a successful build with no problems.
What is a Build Agent?
I’m not fluent in geek computer terms, but suffice it to say that a build agent is a set of code that compiles and builds your deployment package from your source code sitting in VSTS. The build agent will create a zip file and place it to a staging area within VSTS until that build agents is directed to move the artifact/deployment package to somewhere else. VSTS comes with a variety of options for build agents. You can use a build agent that is within VSTS (hosted) or you can create a custom build agent somewhere else.
The Deployment Package
If you already used the default build agent when you created your build pipeline by clicking on Save & Queue, then you created your deployment package. This package will remain in the staging directory until it is ready to be moved by the build agent via a release to your targeted server. Your screen, when you click on the builds, should have the pipeline defined with the deployment package number next to it. 
You can click on the numbered build to get the details and potentially queue a release. Clicking on #20180825.1 brings up the following screen: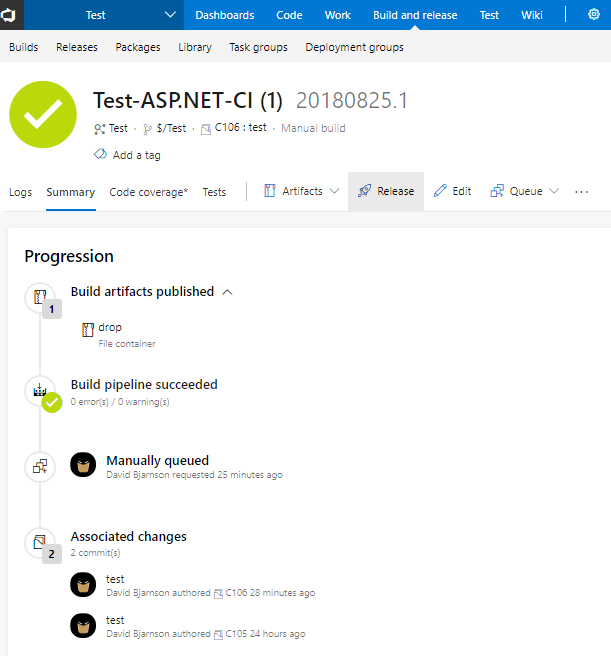
Clicking on the “Release” button will bring up the release pipeline screen (very similar to the build pipeline screen). Since we don’t have a release pipeline configured yet, we will need to do that. But, before building the release pipeline, we need to finalize our connections between the build agent and the targeted server.
Establishing Final Connections
Instead of using a build agent outside of our VM, we are creating it essentially on the same box that we are deploying our package. This will ensure that the connection from VSTS will be bridged via WinRM to our deployment/target server once configured. Before we even create that build agent, we need to create a HTTPS listener. We also need to modify a firewall rule so that the package can be put where it needs to go. Essentially, we are working on the last few gray areas in the graph below starting with the firewall and working backward to the Build Agent and connection with VSTS.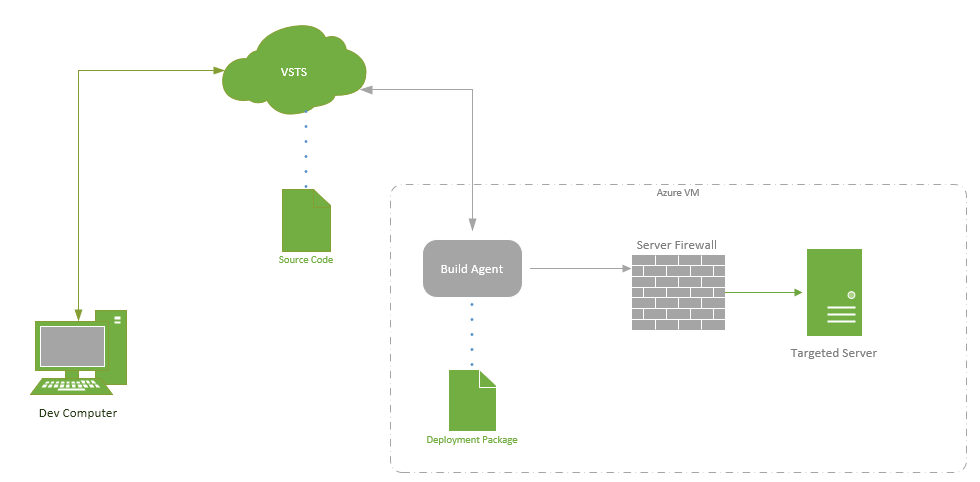
Setting up a HTTPS listener
This seems a bit technical and complex, but if you can copy and paste, you can do it. Your machine/vm should be running WinRM already. If you go to the cmd line on your vm and type in the following,
WinRM e winrm/config/listenerYou will get the following output: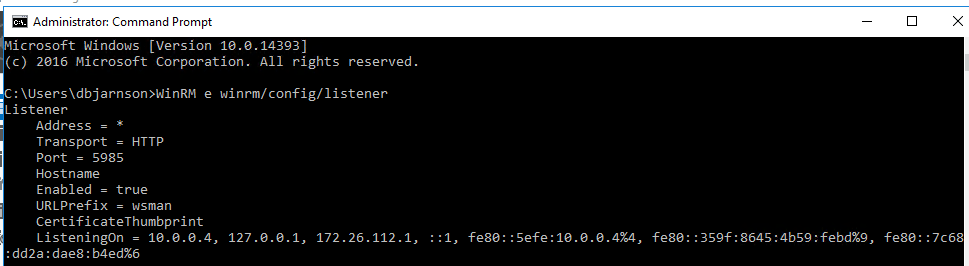
We are working toward getting a listener on Port 5986 via HTTPS with our Hostname as our DNS entry on our VM and a value for the Certificate Thumbprint. This is what we want it to look like:
Getting the Hostname Changed
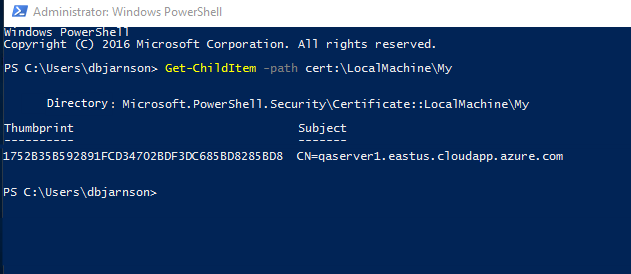
Remember our DNS name from the very start of this walk through? We’re going to need that as well as generate a self-signed certificate. Open up Powershell and type in the following:
New-SelfSignedCertificate -DnsName "<YOUR_DNS_NAME>" -CertStoreLocation Cert:\LocalMachine\MyDon’t forget to replace the value for DNSName with your VM’s DNS Name. When you execute that command, it will take a little bit, but you should have a certificate thumbprint rendered in your Powershell screen as follows:
 Now, copy that thumbprint and run the following command back in your Cmd window:
winrm create winrm/config/Listener?Address=*+Transport=HTTPS '@{Hostname="<YOUR_DNS_NAME>"; CertificateThumbprint="<COPIED_CERTIFICATE_THUMBPRINT>"}Running that script, you will now have configured the HTTPS listener as needed. To confirm that you did this correctly, run this command in your Cmd window: WinRM e winrm/config/listener
This should be your output:
Finalizing the Firewall
The last thing you need to do is to configure an exeption in the firewall so that you can connect to the server. You can either do this through the GUI by going to windows firewall setting or just run this command in your Cmd window:
# Add a new firewall rule
port=5986
netsh advfirewall firewall add rule name="Windows Remote Management (HTTPS-In)" dir=in action=allow protocol=TCP localport=$port
You can now leverage port 5986 over HTTPS to deploy your package once you build your release pipeline and your custom build agent. To recap, here is the progress we made. per our graph: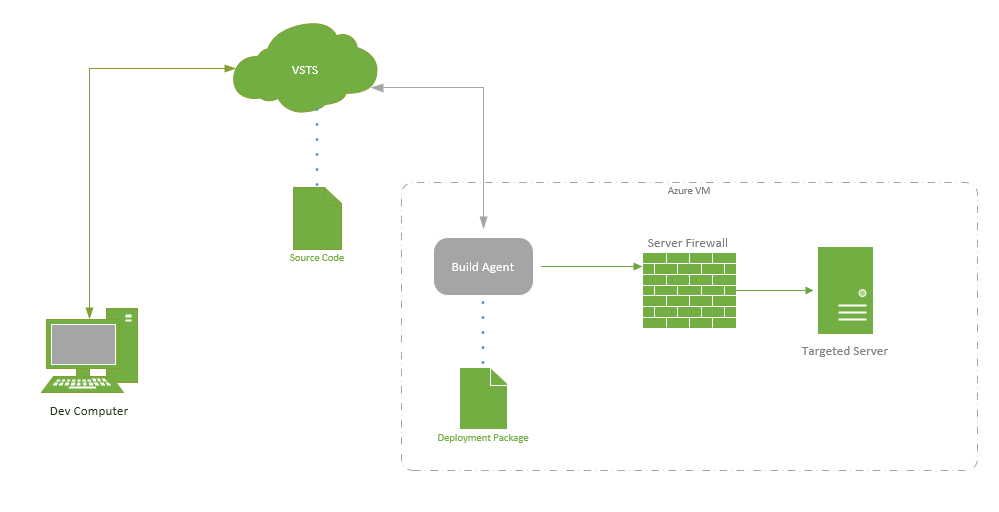
We are now ready to register our build agent. To do this, we are going to create a new deployment pool with our targeted server. We will then have to register our build agent on our targeted server using PowerShell.
Register the Build Agent
To do this, you will need to be connected to your VM and access your VSTS project on that machine.When you get into your main login screen on VSTS, click on the gear icon to access the VSTS settings.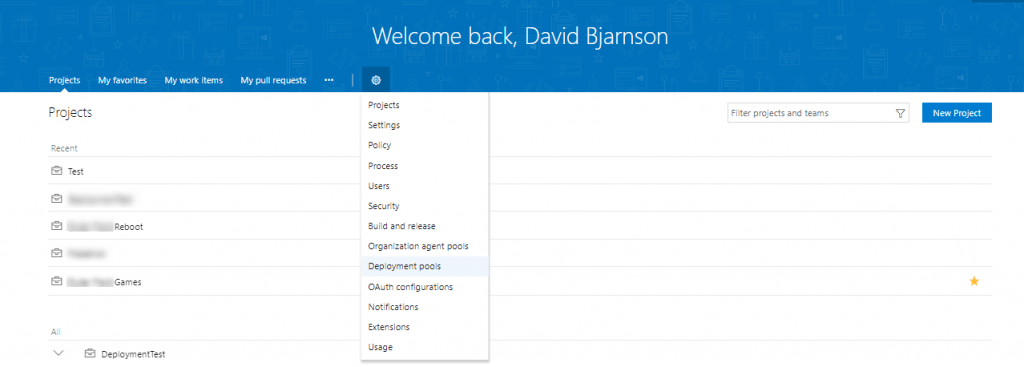
On the drop down menu, click on deployment pools. You should have no entries in the deployment pools (unless you already build a deployment pool from something else). We are going to create an entry/deployment pool by clicking on the New/+ button. A slide in menu on the right will render where we can put in the name of our deployment pool as well as select our project.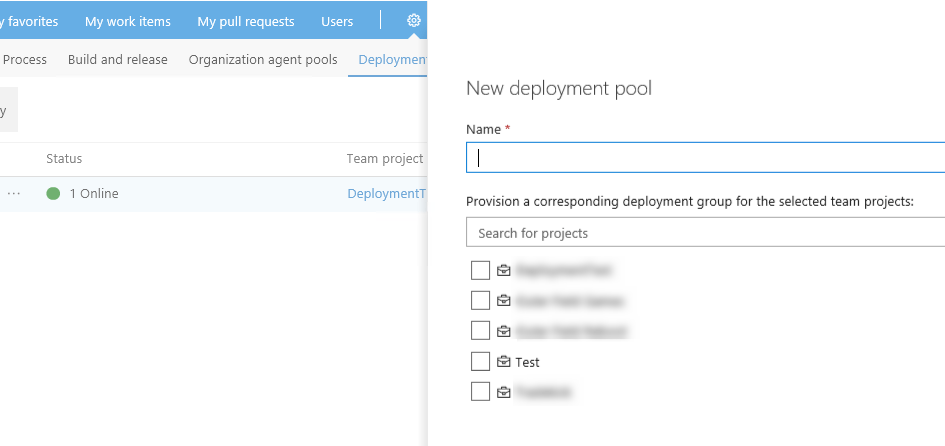
The next thing is you will need to register that agent on your VM via PowerShell. Click on the checkbox to use a personal access token, then click on the copy script to clipboard button. Go back to PowerShell (on your VM) and paste the copied script. Hit enter to run the script. After an initial setup you will be prompted in PowerShell to enter a User account for the service. Just hit enter. Once that is processed, the PowerShell command will change over to the agent (PS C:\vstsagent\<agentId>). If you click on deployment pools again, you will now see your deployment pool listed with a status of online.
The Release Pipeline
Now that we have the build agent created, we are ready to build the release pipeline. From our graph, we are essentially creating this last line (in gray) to complete the process. When you click on your build package in VSTS, you will see the release button on the top.
Clicking on that release button will take you to the build screen for your release pipeline. On this screen, you can either build an empty release, or create a pre-built pipeline with one of the templates. For the quick and easy version of this, I selected the IIS Website Deployment pipeline. I had to scroll through all the templates to find it, but you can also enter in the title of the template to pull it up quicker.
After you select the template, you will be prompted to enter an environment name. Once that is complete, you can close out the slide out menu and click on the task link below the environment name on the main content window.
Pipeline Configuration
There will be a red exclamation point next to the link indicating that there are some configurations needed.
On the IIS Deployment tasks. You will need to put in your deployment group. If you have everything configured correctly from previous steps, it should populate as an option on the drop down menu. With those steps configured, there are two more tasks you will want to add.
Additional Tasks
The first is the Replace Tokens task. You can add it by hitting the + button and searching for “Replace” in the search field. Click on the add button for that task. Add the final task for this release: copy files to. Click the add button and search for copy. You are wanting to select the generic copy task. Once those two tasks are added, drag the replace and copy into first and second positions respectively. Your pipeline tasks should now look like this: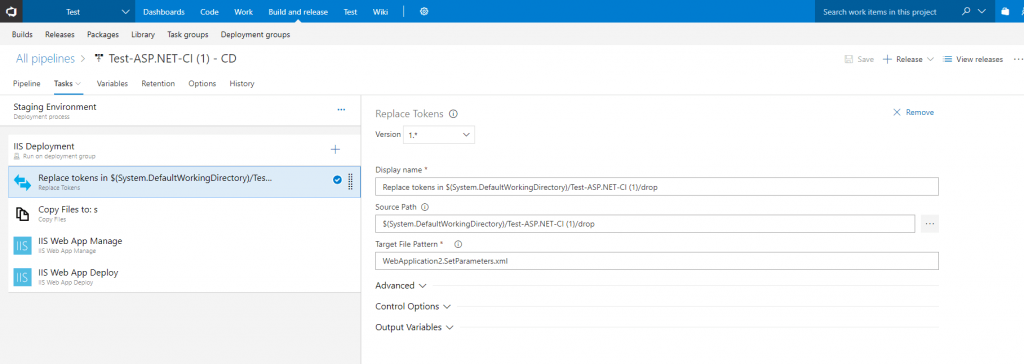
On the Replace task, you need to adjust the Target File Pattern Field so that you specify the SetParameters.xml file from your application. You are also going to need to specify the Source Path. It’s easier if you browse for the drop folder using the ellipses. After that task is configured, drop down to the Copy Files task for additional configuration.
On the copy task, you just need to specify where the build agent is supposed to pick up the package (the drop folder). Simply browse to the drop folder by using the elipses. Once that is specified, you then need to configure where the build agent is supposed to put the files on the targeted server. This is where you put the folder you created on the server as one of the first steps in this walk through. You can see my entries below.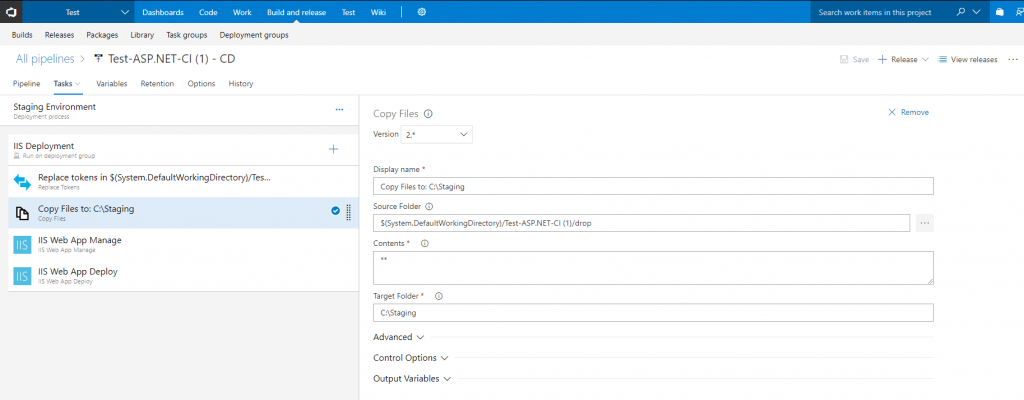
With all of the steps setup, you are now ready to deploy the package through the release pipeline. When you release your deployment package that you built earlier, you can follow along in the pipeline to see the progress. Once you get a success message, login to your targeted server and verify that the folder you setup in the C drive is filled with the files.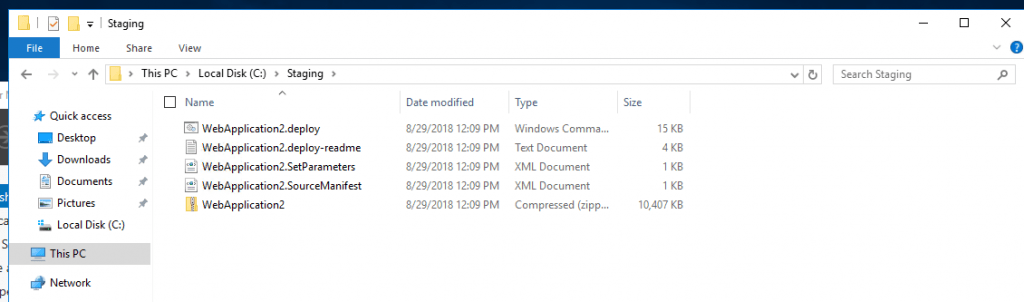
With this basic pipeline, you can now go back and make things a bit more robust, make tweaks, enhancements, etc. And with that, we have everything completed.
Congratulations! You Did It!
Hopefully you found this guide useful. Just a reminder, this is a quick and dirty way to get things from your machine through VSTS all the way to a remote server. There is definitely more to learn. I encourage you to make it a point to go more in depth on any of these steps.
Thanks for reading.
Being > Doing
David Bjarnson